 how-to
Old Ductwork and Energy Efficiency: What You Need to Know
Table of Contents
- How Old Ductwork Reduces Energy Efficiency
- Signs of Leaky Ductwork and Aging Ducts
- Energy Loss in Unconditioned Spaces
- HVAC Duct Insulation and Its Role in Efficiency
- Ductwork Repair vs. Replacement: Making the Right Choice
- Understanding Ductwork Replacement Cost and Savings
- Next Steps: Testing and Verification
- Frequently Asked Questions
Last Updated: October 12, 2026
How Old Ductwork Reduces Energy Efficiency
As ductwork ages, old ductwork energy efficiency drops: leaks, disconnections, and deterioration let conditioned air escape before it reaches your rooms.
What happens inside aging duct systems:
- Seams separate and joints disconnect over decades of temperature cycling
- Flexible ducts crack and tear from age and UV exposure
- Rigid metal ducts rust and corrode, creating holes
The result: your HVAC system runs longer and harder to hold your set temperature, consuming more electricity or gas.
Signs of Leaky Ductwork and Aging Ducts
Catching aging or damaged ductwork early prevents months of wasted energy. Watch for:
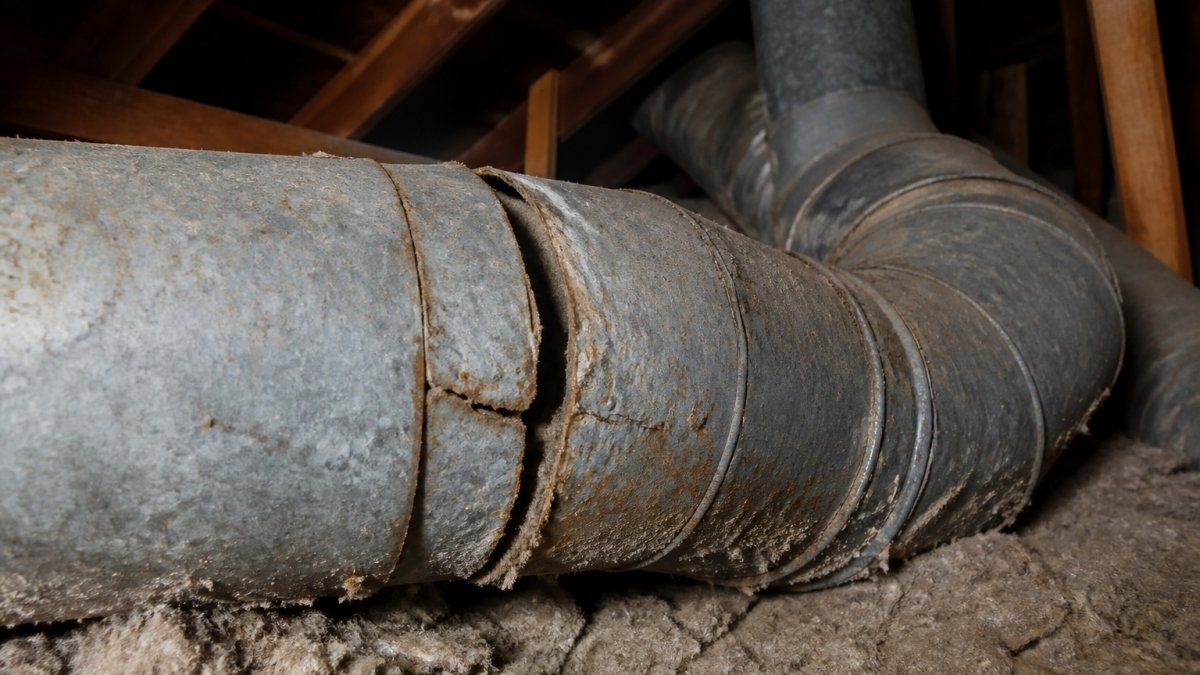
Visible damage inside your attic or crawlspace:
- Disconnected duct sections where joints have separated
- Holes or tears in flexible ducts
- Rust or corrosion on metal ductwork
Performance signs in your home:
- Rooms consistently harder to heat or cool than others
- Uneven temperatures between areas of your house
- Stuffy or stale air in certain rooms
System behavior changes:
- Your HVAC system runs almost constantly without reaching your set temperature
- The system cycles on and off more frequently than it used to
- Whistling or hissing sounds from vents (indicates air escaping through cracks)
Many homeowners blame a failing HVAC unit when the real issue is ductwork, which can fail long before the furnace or air conditioner does.
Energy Loss in Unconditioned Spaces
The biggest problem with old ductwork occurs when ducts run through unconditioned spaces like attics, basements, or crawlspaces.
In winter, heating ducts in a cold basement or crawlspace lose warmth, so air reaching your rooms is cooler than what left the furnace.
The efficiency gap widens because:
- Leaky ducts in unconditioned spaces lose conditioned air directly to those spaces
- Poor insulation allows temperature transfer through the duct walls
- Disconnected sections dump air into attics or crawlspaces instead of rooms
That's why older homes often have higher energy bills: their ductwork predates modern insulation standards and has deteriorated since.
HVAC Duct Insulation and Its Role in Efficiency
Duct insulation keeps conditioned air at the right temperature as it travels from your HVAC unit to your rooms; without it, energy is lost to the surroundings.
Old ductwork often has inadequate or deteriorated insulation because:
- Original insulation was thinner than modern standards recommend
- Insulation degrades over 20-30 years, becoming compressed or crumbly
- Rodents or pests damage insulation
Modern duct insulation standards call for R-8 or higher in most climates (Energy-Efficient Home Improvement Credit Insulation and Air-Sealing Essentials).
Upgrading duct insulation improves efficiency without full replacement, but if ducts are also leaky or disconnected, insulation alone won't solve it.
Ductwork Repair vs. Replacement: Making the Right Choice
The right answer comes from grading the duct system on four dimensions, leakage, insulation condition, structural integrity, and accessibility, then matching the fix to the grade. Treating replacement as the default wastes money; treating sealing as universal leaves efficiency on the table.
Start with a condition assessment, not a guess
A qualified technician evaluates the system against measurable criteria:
- Leakage. Measured with a duct blaster (see the testing section below). Total leakage and leakage to outside are reported separately, because only leakage to outside represents true energy loss.
- Insulation condition. Look for compressed, missing, or moisture-damaged wrap. U.S. Department of Energy guidance points to R-8 insulation on ducts in unconditioned attics in most climates; older systems frequently have R-3 to R-5, or none.
- Structural integrity. Separated joints, crushed flex runs, rusted-through metal, and collapsed interior duct liner are structural failures, sealing alone will not restore them.
A condition-based decision framework
Use these grades as a starting point; a professional inspection refines them for your home.
Grade B, Widespread leakage, sound structure. Leakage spans many joints but the duct material is intact and accessible. Fix: whole-system sealing, aerosol or manual sealing of every accessible joint, plus insulation upgrades where needed.
Grade C, Deteriorated insulation plus moderate leakage. Insulation is compressed, missing, or moisture-damaged across long runs, with leakage present. Fix: seal first, then re-insulate.
Grade D, Structural failure or end-of-life system. Crushed or collapsed flex, rusted-through metal, extensive disconnections, or pre-modern-standard installation. Fix: replace.
Material and era matter
Duct type and installation era shape which fixes are possible:
Call (702) 707-4242 for a free estimate →
- Flexible duct (R-4 to R-8). Common since the 1980s. Prone to crushing, kinking, and inner-liner tears. Short runs can be repaired; long, crushed runs are usually replaced.
- Rigid metal (galvanized sheet). Common in older homes. Durable but joint-heavy; sealing is highly effective if the metal is not rusted through.
- Duct board (fiberglass panels). Common in some regions from the 1970s onward. Difficult to seal reliably; interior surfaces can harbor moisture and biological growth, which often tips the decision toward replacement.
Accessibility changes the math
A leaky joint in an open attic is a 20-minute repair; behind finished drywall it means cutting, patching, and repainting. When a system is largely inaccessible, the cost gap narrows and replacement, done once with modern sealed, insulated ducts, often becomes the more rational long-term choice.
A professional inspection should provide a written condition grade, a leakage measurement, and a side-by-side cost and expected-savings comparison, not a single unsupported recommendation.
Understanding Ductwork Replacement Cost and Savings
Replacement is a real investment, and online claims like "up to 30%" only matter if they connect to your home. Here's what drives cost, how to estimate savings from measured data, and how to verify results.
What drives replacement cost
Replacement pricing scales with:
- Linear feet of duct. The dominant cost driver. Long trunk-and-branch systems cost more than compact ones.
- Accessibility. Ducts in an open attic or unfinished basement are far cheaper to replace than ducts behind finished walls and ceilings, where drywall repair is added to the job.
- System complexity. Zoned systems, multiple returns, and transitions between duct types add labor and materials.
- Duct type. Rigid metal, flexible, and duct board have different material and labor profiles; a mixed system is typically the most labor-intensive.
Because these variables swing widely, any responsible estimate is based on a walkthrough and measured duct layout, not a per-square-foot rule of thumb.
How to estimate savings without guessing
The honest way to estimate savings is to start from measured leakage, not a marketing percentage:
- Measure total leakage and leakage to outside. A duct blaster test reports both (HVAC - Duct Leakage Testing). Leakage to outside is the number that matters for energy loss, because air leaking into conditioned space is not truly lost.
- Estimate the fraction of conditioned air that never reaches the rooms. If leakage to outside is, say, 15% of system airflow, roughly that share of the energy you paid to condition is being dumped into the attic or crawlspace.
- Apply that fraction to your heating and cooling portion of the utility bill. Not the whole bill, only the space-conditioning portion. A typical home's HVAC share varies with climate, but it is the relevant baseline.
- Adjust for climate and duct location. Ducts in a 130°F attic lose far more than ducts in a mild, semi-conditioned basement. The same leakage percentage produces very different dollar losses depending on where the ducts run.
- Subtract the residual leakage of the new system. New, sealed, properly insulated ducts still leak a small amount; the savings estimate is the difference between old and new, not the full old leakage.
A worked example (illustrative, not a promise): if a home spends $1,200 a year on heating and cooling and leakage to outside measures 20%, the theoretical savings ceiling is about $240 a year before residual leakage and runtime changes, real savings are typically lower. A contractor quoting savings should show you this math with your own measurements.
Payback period, honestly framed
Payback is installed cost divided by annual savings. Because both vary widely, payback ranges from a few years for high-leakage systems in extreme climates to well over a decade for low-leakage systems in mild ones. Variables that shorten payback:
- High measured leakage to outside
- Ducts located in unconditioned attics or crawlspaces
- High local utility rates
- Long cooling or heating seasons
Variables that lengthen payback:
- Low measured leakage
- Ducts already in conditioned space
- Mild climate with short peak seasons
- Low utility rates
If a contractor cannot explain which of these applies to your home, the payback number is not trustworthy.
Verify the work with a before-and-after test
The best protection for your investment is a post-installation duct blaster test. Ask for:
- Pre-work leakage to outside (the baseline)
- Post-work leakage to outside (the result)
- Static pressure at the air handler before and after, to confirm the system is not being starved or over-pressurized
- Airflow at each register, to confirm rooms receive the designed airflow
A properly sealed and insulated new system should show a substantial drop in leakage to outside. If the contractor won't perform or share a post-work test, treat that as a red flag.
For a home-specific estimate, request a walkthrough that includes a leakage test and a written comparison of repair versus replacement with the supporting math.
Next Steps: Testing and Verification
Before committing to repair or replacement, understand exactly how much energy your ductwork is wasting.
Duct leakage testing measures how much air escapes your system.
This test reveals:
- How much conditioned air is escaping unused
- Where the major leaks are located
- Whether the problem warrants replacement
- How much improvement you can expect from repairs or replacement
After repairs or replacement, a follow-up test verifies the work solved the problem, showing measurable improvement in ductwork performance.
Many homeowners skip testing assuming the problem is obvious, but testing provides the evidence you need to spend confidently.
Old ductwork is one of the most common but overlooked causes of high energy bills. Call RTS Comfort Cooling & Heating at (702) 707-4242 for a free estimate and professional duct inspection.
Frequently Asked Questions
How does old ductwork affect energy efficiency?
Old ductwork loses conditioned air through cracks, holes, and disconnected joints before it reaches your rooms. This forces your HVAC system to run longer and work harder to maintain the temperature you set. The result is wasted heating and cooling energy, higher utility bills, and uneven comfort throughout your home. Deteriorated duct insulation compounds the problem by allowing heated or cooled air to transfer heat to unconditioned spaces like attics.
What are the signs that HVAC ducts are leaking?
Common signs include rooms that stay warmer or cooler than others, unusually high energy bills without a change in usage, visible dust or debris around duct connections, hissing sounds from the ductwork, and musty odors. You may also notice the HVAC system running constantly or cycling on and off more frequently. If your home has attic ducts, look for visible gaps, rust, or disconnected sections during an inspection. A professional can confirm leaks with duct leakage testing.
Is it better to repair or replace old ductwork?
The choice depends on the extent of damage and your ductwork's age. If ducts are under 15 years old with minor leaks or insulation damage, sealing and reinsulating may restore efficiency cost-effectively. Ducts over 20 years old with widespread deterioration, poor design, or significant air leakage typically benefit from replacement. A professional inspection and duct leakage test can reveal whether repair or replacement offers better long-term savings. Replacement provides a permanent fix.
Can duct insulation lower energy bills?
Yes. Adding or replacing duct insulation reduces the temperature loss as conditioned air travels through unconditioned spaces like attics or crawl spaces. This keeps more of the heated or cooled air in the ducts until it reaches your rooms, allowing your HVAC system to run less frequently. The energy savings depend on the current insulation level, ductwork location, and your climate. Combining insulation with duct sealing typically delivers the best results for improving overall system efficiency and reducing operating costs.