 how-to
7 Signs Your Air Ducts Are Leaking (2026 Guide)
Table of Contents
- 7 Signs Your Air Ducts Are Leaking
- How to Inspect Your Ductwork for Leaks
- Duct Leakage Testing: What to Expect
- How to Improve Indoor Air Quality by Sealing Duct Leaks
- Cost-Benefit Analysis of Duct Repair
- Get a Professional Duct Assessment
- Frequently Asked Questions
Last Updated: September 4, 2026
7 Signs Your Air Ducts Are Leaking
Leaky ductwork quietly undermines your HVAC system, forcing it to work harder while conditioned air escapes into attics and crawlspaces instead of reaching your living spaces. In this guide from RTS Comfort Cooling & Heating, we break down the seven most common signs your air ducts are leaking, how to confirm the problem, and what repair actually involves.
Duct leaks hide behind walls, above ceilings, and under insulation, so by the time you notice symptoms, you have likely been paying for wasted energy for months. Below, we'll show you how to spot the warning signs early, test for leaks yourself, and decide when professional duct leakage testing is worth the investment.
1. High Energy Bills with No Change in Usage
A sudden jump in your utility bills without a corresponding change in thermostat settings is often the first red flag. When ducts leak, your HVAC system must run longer cycles to compensate for the conditioned air escaping before it reaches the rooms you occupy. The U.S. Department of Energy notes that duct leakage can account for significant energy losses in typical homes, making efficiency improvements a priority for reducing consumption U.S. Department of Energy duct sealing guidance.
Compare your current bills to the same period last year. If usage habits stayed consistent but costs climbed noticeably, leaky ducts deserve suspicion before you blame the rate increase.
2. Uneven Temperatures and Hot or Cold Spots
Finding one room noticeably warmer or cooler than the rest points to airflow loss in specific duct branches, where supply vents may deliver weak airflow while others feel normal. This happens when leaks or disconnections occur along the duct run serving that zone.
Hot and cold spots are especially common in rooms furthest from the air handler, where pressure drops make leaks more impactful. If adjusting your dampers does not balance the temperatures, duct leakage is a likely culprit.
3. Excessive Dust and Poor Indoor Air Quality
Dust accumulating on furniture within hours of cleaning suggests your ductwork is pulling in unfiltered air from attics, crawlspaces, or wall cavities. Leaks in the return air side of the system create negative pressure that sucks dust, insulation fibers, and allergens directly into the airstream.
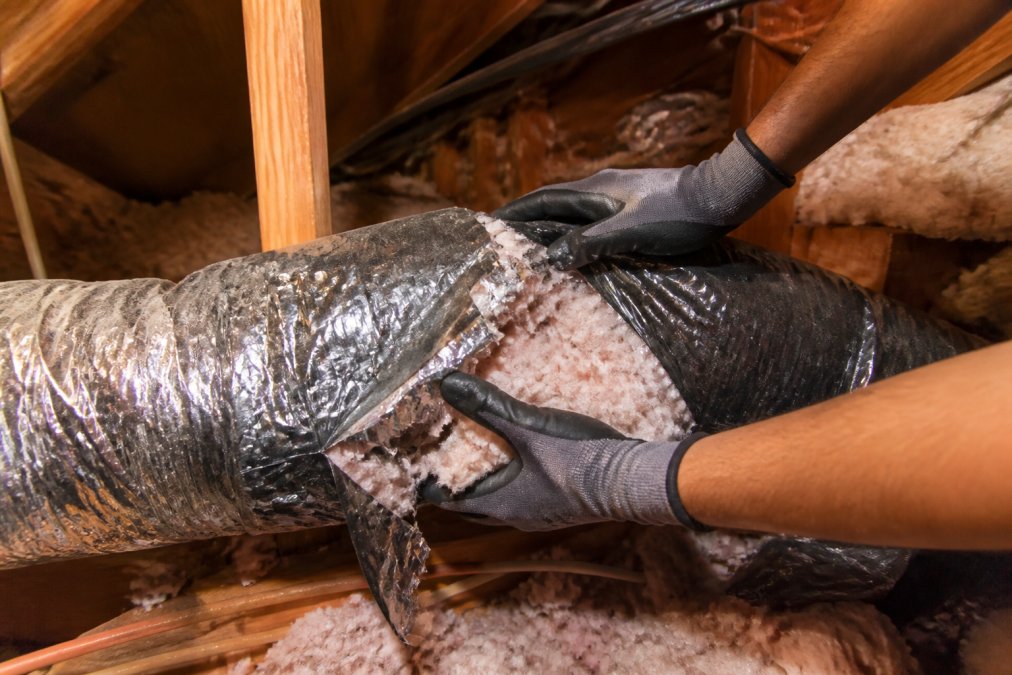
Beyond visible dust, a musty odor when the system runs is unfiltered attic or crawlspace air entering through leaks. Sealing and professional duct cleaning reduce the particulate load circulating through your home.
4. Visible Damage to Your Ductwork
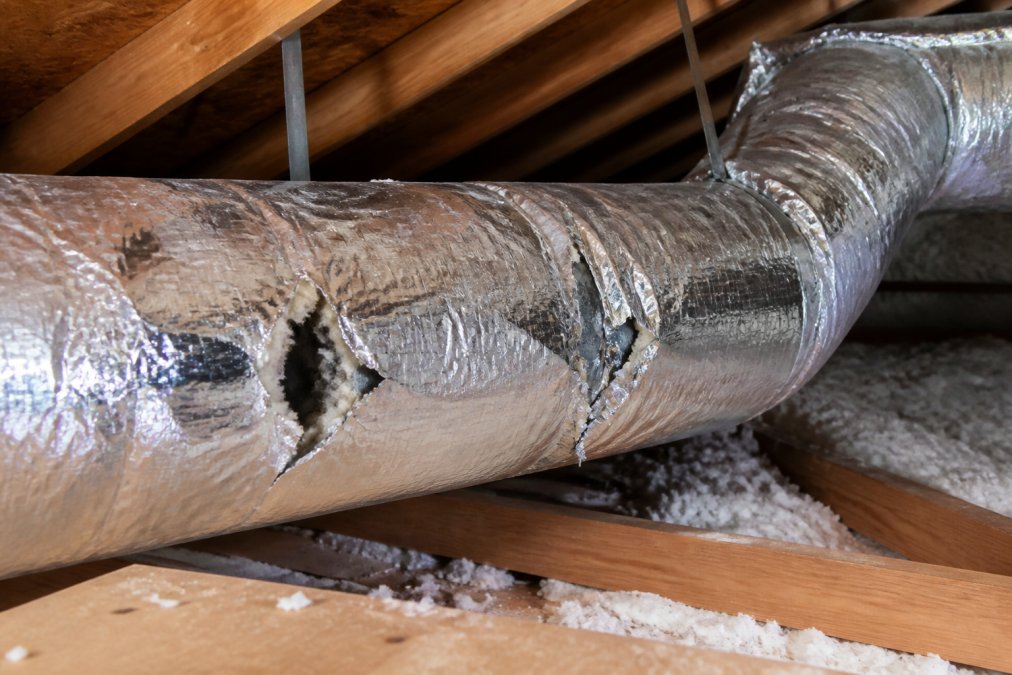
Exposed ductwork in attics, basements, and utility rooms often shows clear damage: crushed sections, separated joints, punctures, or disconnected branches. Flexible ducts are particularly vulnerable to tears from storage items or pest activity.
Look along the entire accessible run for gaps at connections, obvious holes, and sections where the foil facing has deteriorated. Also check the plenum where the main trunk connects to the air handler, since this joint frequently separates. Visible damage almost always means measurable air leakage.
5. Noisy HVAC System
Whistling, rattling, or whooshing sounds from your ductwork indicate air escaping through gaps or obstructions. A whistling noise typically means air is forcing through a narrow opening, while rattling can signal loose duct sections vibrating against framing.
These sounds often intensify when the system runs at full capacity. Beyond the annoyance, airflow loss from these leaks reduces system efficiency and forces the blower to work harder.
6. Health Symptoms That Improve When You Leave Home
Respiratory irritation, headaches, or allergy flare-ups that ease after spending time away from the house may trace back to duct leaks pulling contaminants into your breathing air. Leaky return ducts can draw in dust, mold spores, and insulation particles from unconditioned spaces, then distribute them through the supply vents.
If symptoms consistently improve when you travel or spend extended time elsewhere, indoor air quality deserves investigation. Sealing duct leaks and upgrading filtration are practical first steps.
7. Duct Material Breakdown
Older homes often contain duct systems past their serviceable life, with deteriorated insulation backing, crumbling fiberglass duct board, or metal ducts with failing tape at every joint. Flexible ducts degrade faster than rigid metal, especially in hot attics where temperature extremes break down the plastic and insulation over time.
Rigid metal ducts can often be sealed and reused effectively, while brittle flex duct with crushed sections may require replacement. A professional assessment determines which sections are salvageable and which need new material.
How to Inspect Your Ductwork for Leaks
A visual inspection is your first line of defense, but it must be tailored to the type of ductwork you have. Each material fails differently. Here is a material-by-material breakdown to guide your inspection in the attic, crawlspace, or basement.
Flex Duct: The Most Common Failure Point
Flexible ducts, the silver, foil-lined tubes with plastic ribs, are the most prone to leaks. Their weakness is not the duct wall itself but the connections and the internal wire helix.
- Check the connections first. The plastic collar where flex duct meets a metal trunk line or the air handler is the #1 leak point. The manufacturer's recommended installation uses a metal clamp over the inner plastic liner and a separate clamp over the outer foil insulation. If you see only a single clamp, or if the foil is pulled back exposing the inner plastic, air is escaping. Pull gently on the connection, if it slides off the metal collar, it is disconnected.
- Look for crushing and kinking. Flex duct crushed against a joist or folded sharply loses 20-30% of its cross-sectional area. Run your hand along the length; any sharp bend or flat spot is a flow restriction that also creates a pressure point where leaks develop.
- Inspect the foil jacket for tears. In attics, rodents and stored items are the primary culprits. A tear in the outer foil does not always mean a leak in the inner plastic liner, but it compromises the insulation value and allows condensation to form. If the inner liner is also torn, you have a direct leak.
Sheet Metal Ducts: Where the Joints Fail
Rigid sheet metal ducts are more durable, but they leak at every single joint and seam. A typical home has 30-50 connections, and each one is a potential failure point.
- Examine the joints. Look for the gray, putty-like mastic or the shiny foil tape. Mastic that is cracked, crumbled, or missing entirely is a leak. Foil tape that is peeling at the edges or showing bubbles is failing. Do not confuse standard cloth duct tape with proper foil tape, cloth tape dries out and falls off within a year.
- Check the drive cleats. These are the metal strips that lock two rectangular duct sections together. They are notorious for gaps at the corners. Run your finger along the corner of each drive cleat; if you feel a draft while the system is running, that is a leak.
- Inspect the plenum connection. The plenum is the large box that attaches directly to the furnace or air handler. The joint where the round supply ducts tap into the plenum is a high-stress point. Look for gaps around the perimeter of each tap, these are often the largest leaks in a metal duct system.
Duct Board: The Hidden Deterioration
Duct board, the rigid, fiberglass panels with a foil facing, is common in older homes and in unconditioned spaces. Its failure mode is internal, making it the hardest to inspect visually.
- Look for surface crumbling. Duct board is essentially compressed fiberglass. If the foil facing is punctured, the fiberglass underneath erodes over time, sending fibers into your airstream. Check for soft spots or areas where the board feels spongy.
- Check the seams. Duct board is joined with a special aluminum tape and a staple pattern. If the tape has lifted, you will see the staples holding the board together. These seams are prone to opening as the board expands and contracts with temperature swings.
- Feel for airflow. Duct board leaks are often invisible because the board itself absorbs the air pressure. Run your hand slowly over the entire surface, especially near corners and edges, while the system is on. A subtle, cool draft indicates a leak that the eye cannot see.
A Practical Inspection Sequence
Work through this sequence to cover the entire accessible system:
- Turn the system ON and set the thermostat to fan-only mode so airflow is continuous.
- Start at the air handler. Check the plenum connection and all branch taps.
- Walk the main trunk line. Feel every joint and seam with the back of your hand.
- Trace each branch duct to its register boot. Check where the flex duct connects to the boot, this is the second most common failure point.
- Mark every suspect spot with a piece of painter's tape. Do not use permanent marker on flex duct, as solvents can degrade the plastic.
If you find any of these failure patterns, you have confirmed a leak source. The next step is determining whether the total leakage justifies professional repair, which requires a duct leakage test.
Duct Leakage Testing: What to Expect
Professional duct leakage testing measures how much conditioned air escapes through your duct system. The most common residential method uses a duct blaster, a calibrated fan that pressurizes the ductwork to measure airflow loss through leaks. Some contractors also use a blower door test to measure the home's overall envelope leakage and identify how ducts interact with the building shell Building Performance Institute duct testing standards.
The testing process typically takes one to two hours. The technician seals all supply and return registers, connects the testing equipment to the duct system, and measures leakage at standard operating pressures. Results are reported as a percentage of total airflow lost or as cubic feet per minute of leakage.
| Test Method | What It Measures | Best For |
|---|---|---|
| Duct blaster test | Airflow loss through duct leaks under pressure | Quantifying total duct leakage |
| Blower door test | Whole-home air leakage and pressure differences | Finding hidden leaks and envelope issues |
| Visual inspection | Visible gaps, damage, and disconnections | Quick assessment and locating obvious leaks |
| Thermal imaging | Temperature differences along duct runs | Identifying insulated leaks and poor connections |
How to Improve Indoor Air Quality by Sealing Duct Leaks
Sealing duct leaks is one of the most effective ways to improve indoor air quality because it stops contaminants at the source. The recommended materials are mastic sealant, a paste applied over joints, and foil tape designed specifically for ductwork. Standard cloth duct tape fails quickly under temperature changes and should never be used for permanent repairs.
Small gaps at connections respond well to mastic applied with a brush. For larger holes or separated joints, apply fiberglass mesh tape first, then coat with mastic. Sealing the return side of the system matters most for air quality, since leaks there pull in unfiltered contaminants. After sealing accessible leaks, consider professional duct cleaning to remove debris already deposited in the system.
Cost-Benefit Analysis of Duct Repair
The decision to repair or replace ductwork comes down to a simple question: is the cost of fixing the leaks less than the value of the energy you are losing? To answer that, you need to understand the three cost tiers and the payback math behind each.
Tier 1: DIY Sealing of Accessible Leaks
If your inspection found leaks at accessible joints and connections, and your ductwork is otherwise in good condition, DIY sealing is a legitimate first step.
- Materials cost: A 1-gallon bucket of mastic sealant costs $20-30. A roll of UL-181-rated foil tape costs $10-15. A 3-inch brush for applying mastic costs $5. Total investment: $35-50.
- Labor time: A typical homeowner can seal 10-15 joints in a single afternoon, assuming the ducts are accessible and you are working in a crawlspace or attic.
- Expected savings: The U.S. Department of Energy states that sealing ducts can improve HVAC efficiency by up to 20% (energy.gov). For a home with $200/month average heating and cooling costs, that translates to roughly $40/month in potential savings, meaning the DIY materials pay for themselves in the first month or two.
The catch: DIY sealing only works if you have found the leaks. If you cannot access the ducts or if the duct material is deteriorating (crumbling duct board, crushed flex), DIY mastic will not solve the problem.
Tier 2: Professional Sealing of Accessible Leaks
Professional duct sealing is priced by the number of joints sealed and the accessibility of the duct runs.
- Typical cost range: Pricing for professional duct sealing depends on the extent of the leaks and the accessibility of the duct runs. For current pricing, please contact RTS Comfort Cooling & Heating for a free estimate.
- What you get: A professional will also check the pressure balance of the system and may identify leaks you missed. Many contractors include a follow-up duct leakage test to verify the work.
- Payback period: If your duct leakage is measured at 20% of total airflow, and your annual heating and cooling costs are $2,400, you are losing roughly $480/year. A professional sealing job can pay for itself over time through energy savings.
Tier 3: Full Duct Replacement
Replacement is only necessary when the duct material itself has failed, crushed flex duct, deteriorated duct board, or metal ducts with extensive corrosion.
- Typical cost range: The cost of replacing ductwork depends on the size of your home, accessibility, and the materials chosen. For current pricing, please contact RTS Comfort Cooling & Heating for a free estimate.
- When it makes sense: If your ducts are more than 20 years old and you are seeing multiple failure types (crushed sections, separated joints, deteriorated insulation), sealing is a temporary fix. The cost of repeated service calls will eventually exceed the cost of replacement.
- The efficiency argument: New ductwork, properly sealed and insulated, can reduce your HVAC energy consumption by 20-30% compared to a leaking, uninsulated system. On a $2,400/year energy bill, that is $480-720 in annual savings, putting the payback period for a replacement at several years.
The Decision Framework
Use this simple framework to decide which tier is right for you:
| Condition Found | Recommended Action | Typical Cost | Payback Period |
|---|---|---|---|
| 1-5 accessible joint leaks, duct material in good shape | DIY sealing | $40-50 | 1-2 months |
| Multiple leaks across accessible runs, some uncertainty | Professional sealing | Pricing depends on the scope of work | Varies based on energy savings |
| Crushed flex duct, crumbling duct board, or separated trunk lines | Professional assessment; likely replacement of affected sections | Pricing depends on the scope of work | Varies based on energy savings |
| System-wide deterioration, ducts over 20 years old | Full duct replacement | Pricing depends on the scope of work | Varies based on energy savings |
Before committing to any repair, check with your local utility company. Many offer rebates or incentives for duct sealing and air sealing work performed by certified contractors, which can reduce your out-of-pocket cost by 10-30%.
Get a Professional Duct Assessment
The signs of leaking air ducts range from obvious physical damage to subtle comfort complaints, but they all point to the same underlying problem: conditioned air escaping before it reaches your living spaces. If you have noticed rising energy bills, uneven temperatures, or worsening indoor air quality, professional duct leakage testing provides the data you need to act with confidence.
RTS Comfort Cooling & Heating serves Las Vegas homeowners with comprehensive HVAC services, including duct cleaning, indoor air quality improvement, and attic insulation. Our experienced team performs thorough duct assessments to locate leaks and recommend the most cost-effective repairs. With 24/7 emergency service and professional smart thermostat installation, we keep your home comfortable year-round.
Frequently Asked Questions
How can I determine if my AC ducts are leaking?
Start with a visual inspection of exposed ductwork in your attic or crawlspace. Look for disconnected joints, punctures, or crushed flexible ducts. Then run your HVAC system and hold your hand near suspected leaks to feel for airflow. For a precise answer, schedule duct leakage testing. A professional uses a pressure test to measure how much conditioned air escapes, giving you exact numbers on where the problem is and how severe it is.
Can leaky air ducts cause high energy bills?
Yes. Leaking ducts force your HVAC system to work harder to maintain your desired temperature, which increases energy consumption and drives up utility bills. In a typical home, duct leaks can waste a significant portion of the air your system produces. Sealing leaks with mastic sealant or foil tape helps your system operate efficiently, which can lead to noticeable savings over time.
How can I fix leaky ductwork?
Small leaks at connections can often be sealed with mastic sealant or foil tape, both available at hardware stores. Avoid standard duct tape, which degrades quickly. For larger gaps or crushed sections, you may need to replace the damaged portion of duct. If leaks are extensive or hard to reach, hire an HVAC technician to seal the system properly and ensure your air distribution is balanced.
How do I know if my ductwork needs to be replaced?
Replacement is usually the right call when ducts show widespread damage, such as multiple crushed flexible sections, corroded metal, or deteriorated insulation. If your ducts are over 20 years old and have never been serviced, replacement may be more cost-effective than repeated repairs. A professional assessment can confirm whether sealing leaks is enough or if new ductwork will provide better HVAC performance and indoor air quality.
Leaky ducts waste energy, compromise comfort, and degrade indoor air quality, but the problem is fixable once you identify it. A professional assessment separates minor sealing projects from major replacements, saving you money on unnecessary work. Call (702) 707-4242 for a free estimate and take the first step toward a more efficient, comfortable home.
This article was written using GrandRanker