 how-to
HVAC Maintenance Checklist for Summer: 7-Step Guide
Table of Contents
- Why Your AC Needs a Summer Maintenance Checklist
- DIY AC Maintenance Tips: 5 Tasks to Do Yourself
- How Often to Service AC Unit: Professional Tune-Ups
- Signs Your AC Needs Professional Repair
- The Energy Efficiency ROI of Preventative Maintenance
- Smart Home Integration and Thermostat Calibration
- Troubleshooting Common Summer AC Failures
- Conclusion: Your Summer AC Action Plan
- Frequently Asked Questions
Last Updated: September 8, 2026
Why Your AC Needs a Summer Maintenance Checklist
A summer hvac maintenance checklist is the difference between steady cooling and an emergency call on the hottest afternoon of the year. A summer hvac maintenance checklist is the difference between steady cooling and an emergency call on the hottest afternoon of the year.
The stakes are higher in desert climates because your system runs nearly continuously for months. Below, we show you the essential tasks, which jobs belong on your DIY list, and when to bring in a licensed technician.
DIY AC Maintenance Tips: 5 Tasks to Do Yourself
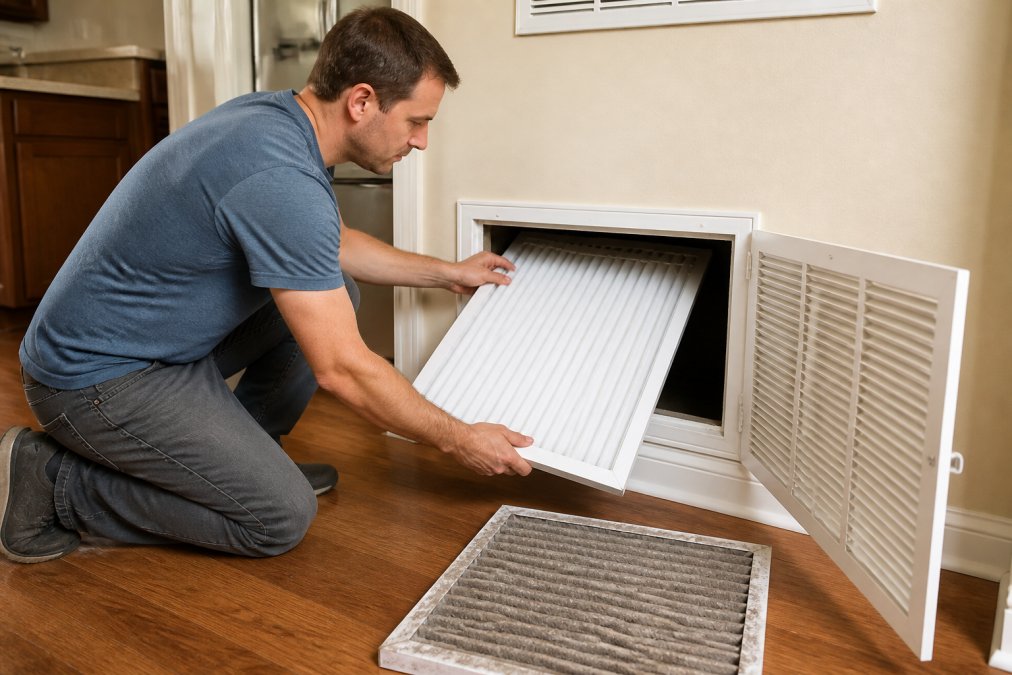
Replace or Clean Your Air Filter
Your air filter is the first line of defense for both your equipment and your indoor air quality. A clogged filter restricts airflow, making the blower motor work harder and potentially causing the evaporator coil to freeze over.
Check your filter monthly during peak cooling season. Flat fiberglass filters typically need replacement every 30 days, while pleated filters with a higher MERV rating guide from the EPA can often last up to 90 days. The exact interval depends on your filter type, household pets, and dust levels.
How to check: Hold the filter up to a light source. If you cannot see light through the material, it is time for a replacement.
Filter sizing: The filter size is printed on the cardboard frame. Installing the wrong size allows unfiltered air to bypass the filter, coating the evaporator coil with dust and reducing heat transfer efficiency.
Clear Debris from the Condenser Unit
The condenser unit sits outside and rejects heat from your home into the outdoor air. If fan blades are clogged with grass clippings, leaves, or cottonwood fluff, the unit cannot shed heat effectively, which raises head pressure and strains the compressor. Turn off power at the disconnect box before cleaning.
Cleaning procedure:
- Remove large debris like leaves, twigs, and grass clippings by hand.
- Use a garden hose with a spray nozzle to wash the coil from the inside out, pushing debris away from the fins.
- Spray at a slight downward angle to avoid bending the aluminum fins. Straighten bent fins with a fin comb, available at hardware stores for under $15.
- Rinse the coil thoroughly until the water runs clear.
Clean the Condensate Drain Line
The condensate drain line carries moisture away from the evaporator coil. In humid conditions, algae and mold can form inside the line and create a blockage, leading to water backing up into your home or triggering a safety shutoff. Locate the PVC drain line near your indoor unit, typically a 3/4-inch white PVC pipe running from the air handler to a floor drain or outside. Find the access tee, a T-shaped fitting with a removable cap, and remove the cap.
Preventive treatment: Pour one cup of distilled white vinegar or a commercial condensate treatment down the access tee at the start of the season and again mid-summer. Do not use bleach, as it can damage the PVC pipe and the drain pan. If the line is already clogged: Use a wet/dry vacuum to suction the blockage from the outside end. If the clog persists, insert a stiff wire brush or plumbing snake to break up the obstruction, then pour water down the line to confirm it drains freely.
Check the Evaporator Coil and Blower Assembly
The evaporator coil sits inside the air handler, typically in the attic, basement, or a closet. When it is dirty, heat transfer drops, causing the system to run longer and consume more energy. Accessing the coil: Turn off power to the indoor unit at the breaker panel, remove the access panel, and use a flashlight to inspect the coil.
What to look for: A clean coil has bright aluminum fins. A dirty coil shows a layer of gray or brown dust, and in severe cases, the fins may be matted with pet hair or lint. If visibly dirty, clean it with a commercial coil cleaner spray. Apply the foam, let it sit for 10 minutes, then rinse with a gentle stream of water. Avoid using a pressure washer, which can bend the fins. Blower wheel inspection: While the access panel is off, inspect the blower wheel, a cylindrical cage of metal fins. Vacuum it with a brush attachment or use a stiff-bristled brush to dislodge stubborn dust.
Inspect and Clean the Thermostat
A thermostat that is dirty, miscalibrated, or poorly placed will cause your system to run longer than necessary. Dust inside the housing can interfere with the temperature sensor. Cleaning procedure: Turn off power at the breaker or remove the batteries, remove the faceplate, and use a soft brush or compressed air to remove dust. Check that wire connections are snug and free of corrosion.
How Often to Service AC Unit: Professional Tune-Ups
The question of how often to service ac unit comes down to a simple rule: schedule a professional tune-up at least once per year, ideally in early spring before the cooling season begins. Many manufacturers also require annual professional maintenance to keep your warranty valid. A professional visit goes beyond what a homeowner can safely do. Technicians check refrigerant levels, test electrical connections, measure voltage across components, and inspect the compressor and blower motor. For homes in extreme climates like Las Vegas, a second tune-up in late summer can be worthwhile, as catching a failing capacitor early prevents an inconvenient breakdown during a heat wave.
| Maintenance Task | DIY or Professional | Recommended Frequency |
|---|---|---|
| Replace air filter | DIY | Every 1-3 months |
| Clear condenser debris | DIY | Monthly during summer |
| Clean condensate line | DIY | Start of season, mid-summer |
| Full system tune-up | Professional | Annually, before summer |
| Refrigerant check | Professional | Annually |
| Electrical testing | Professional | Annually |
Signs Your AC Needs Professional Repair
Knowing the signs your ac needs professional repair keeps a small issue from becoming a full system replacement. If you notice any of the following, stop your DIY work and call a licensed technician, because continuing to run the unit can cause permanent damage. Weak airflow from your registers often points to a failing blower motor or a severely restricted duct. Warm air blowing from vents when the thermostat calls for cooling indicates a refrigerant leak or a compressor problem. Unusual noises like grinding, squealing, or rattling from the outdoor unit suggest bearing failure or loose components. Water pooling around the indoor unit signals a blocked drain line or a cracked condensate pan. A sudden spike in your electric bill without a change in usage often means the system is running inefficiently due to low refrigerant or a dirty coil. Ice forming on the refrigerant lines or evaporator coil requires professional diagnosis.
The Energy Efficiency ROI of Preventative Maintenance
Preventative maintenance is one of the few home investments that pays for itself within a single cooling season. A dirty condenser coil and a clogged filter force your system to run longer and work harder to move the same amount of heat, directly increasing your monthly utility bills.
According to Energy Star guidance on maintenance, a dirty air filter can increase your system's energy consumption noticeably, and regular maintenance keeps your equipment operating at its rated efficiency. When your system runs efficiently, it cycles less often and maintains a more consistent indoor temperature, which reduces wear on moving parts and extends the lifespan of the equipment.
The return on investment appears in two forms: lower monthly operating costs and deferred replacement costs. A well-maintained system can last several years longer than a neglected one, and delaying a full system replacement by even two or three years represents substantial savings. Pairing regular maintenance with a programmable thermostat amplifies these gains by reducing runtime during unoccupied hours.
Call (702) 707-4242 for a free estimate →
Smart Home Integration and Thermostat Calibration
Modern smart thermostats add a layer of convenience and efficiency to your hvac maintenance routine, but they do not replace the physical maintenance tasks. Thermostat calibration ensures the temperature reading matches the actual room temperature, preventing your system from running longer than necessary.
A smart thermostat learns your schedule and adjusts temperatures automatically when you are away or asleep, reducing runtime during peak heat hours and lowering cooling costs. However, the thermostat only controls the system; it cannot compensate for a dirty coil or a failing blower motor.
If you are installing a smart thermostat yourself, verify that your existing wiring supports it. Many homes, especially older ones, lack the common wire, or C-wire, needed to power the thermostat continuously. A guide to thermostat wiring from the Department of Energy explains the basics, but if you encounter an unfamiliar wire configuration, professional installation prevents damage to your system's control board. RTS Comfort Cooling & Heating offers professional smart thermostat installation.
Troubleshooting Common Summer AC Failures
Problem 1: AC Runs But Does Not Cool
Quick checks you can do:
- Thermostat settings: Confirm it is set to "Cool" mode and the setpoint is at least 5 degrees below the current room temperature. If the display is blank, check the circuit breaker and replace the batteries.
- Air filter: A clogged filter is the most common cause of reduced cooling. Remove the filter and hold it up to a light. If you cannot see light through it, replace it immediately.
- Outdoor unit: Check if the condenser fan is spinning. If the fan is not spinning but you hear the compressor humming, the start capacitor has likely failed. This is a professional repair.
- Supply registers: Check that all supply vents are open and unobstructed by furniture, rugs, or curtains.
If these checks do not resolve the issue: The problem is likely low refrigerant, a failing compressor, or a malfunctioning expansion valve. These require professional diagnosis. Low refrigerant levels indicate a leak that requires professional repair, since simply adding refrigerant without fixing the leak is both illegal under EPA Section 608 regulations and ineffective.
Problem 2: Frozen Evaporator Coil
Ice forming on the refrigerant lines or evaporator coil is a common summer failure, especially during humid stretches. The two primary causes are restricted airflow and low refrigerant. Immediate action: Turn off the system at the thermostat and switch it to "Fan Only" mode. This melts the ice without running the compressor. Do not run the AC with a frozen coil, as this can cause liquid refrigerant to flood back to the compressor and destroy it. After the ice melts (allow 2-4 hours): Check and replace the air filter if dirty, inspect the supply registers, and check the condensate drain line for blockages. If the coil freezes again after these checks, you likely have a refrigerant leak. Call a licensed technician.
Problem 3: AC Short Cycles (Turns On and Off Frequently)
Short cycling, where the system runs for less than 10 minutes before shutting off, causes rapid wear on the compressor and increases energy consumption. Quick checks you can do:
- Thermostat placement: If the thermostat is near a heat source, like a kitchen appliance or direct sunlight, it will sense the heat and call for cooling even when the rest of the house is comfortable. Move the thermostat or adjust the schedule.
- Thermostat differential: Check the temperature differential setting. A default differential of 1 degree causes frequent cycling. Increasing it to 2 degrees reduces wear on your compressor.
- Oversized unit: If the system cools the house too quickly, it may short cycle because the thermostat reaches the setpoint before the system has run a full cycle. This is a design issue that requires professional evaluation.
If these checks do not resolve the issue: A failing compressor, a refrigerant leak, or a faulty thermostat sensor may be the cause. Professional diagnostics are necessary.
Problem 4: Tripped Circuit Breaker
If your AC will not turn on at all, check the circuit breaker panel. A tripped breaker is a common issue, especially after a power surge or during a heat wave when the system draws high starting current. What to do: Locate the breaker labeled for the AC system (often marked "AC" or "Condenser"), reset it by flipping it fully to "Off" then back to "On," and wait 5 minutes before turning the thermostat back on. This allows the compressor internal pressure to equalize. If the breaker trips again immediately: Do not reset it a third time. A repeated trip indicates a short circuit, a failing compressor, or a grounded component. Continuing to reset the breaker risks electrical fire. Call a licensed technician.
Problem 5: Water Leaking Around the Indoor Unit
Water pooling around the air handler indicates a blocked condensate drain line or a cracked drain pan. Quick checks you can do:
- Drain line: Locate the PVC drain line and check for visible blockages. Use a wet/dry vacuum to suction the line from the outside end.
- Drain pan: Inspect the drain pan for cracks or rust. If cracked, it needs replacement, which is a professional job.
- Humidity level: If your home has high humidity (above 60%), the system will produce more condensate than normal. A dehumidifier can help reduce the load on the drain system.
When to Skip DIY and Call a Professional
If you have performed the quick checks above and the system still fails, stop troubleshooting and call a licensed technician. Attempting repairs on refrigerant lines, compressors, or electrical components without proper training and EPA certification is dangerous and can void your manufacturer's warranty.
Conclusion: Your Summer AC Action Plan
The most effective approach to summer cooling is a proactive one. Start with the DIY tasks you can handle today, replace or clean your air filter, clear debris from the condenser unit, and flush the condensate drain line. Then schedule a professional tune-up to handle the refrigerant levels, electrical connections, and component inspections that require specialized training and tools.
When you need professional help, RTS Comfort Cooling & Heating provides comprehensive HVAC services including routine maintenance, 24/7 emergency repair, and smart thermostat installation. Our team serves Las Vegas homeowners with reliable climate control and improved indoor air quality. Call (702) 707-4242 for a free estimate and ensure your system is ready for the summer heat.
Frequently Asked Questions
What should the thermostat be set at during the summer?
The U.S. Department of Energy recommends setting your thermostat to 78°F when you are home and awake. Raising it by 7-10°F for eight hours a day, such as while you are at work, can save up to 10% on cooling costs. A programmable or smart thermostat automates this schedule so you do not have to remember to adjust it manually.
How often should I change my air filters in the summer?
During peak cooling season, check your air filter every 30 days. A standard 1-3 inch fiberglass filter typically needs replacement monthly when the AC runs frequently. Homes with pets or family members with allergies may require replacement every 2-3 weeks. A clogged filter with a high MERV rating can restrict airflow and freeze the evaporator coil, leading to costly repairs.
What are the signs my AC needs professional repair?
Key indicators include weak airflow from vents, warm air blowing when the thermostat is set to cool, unusual noises like grinding or hissing from the condenser unit, or a sudden spike in energy bills. Ice forming on the refrigerant lines or evaporator coil indicates a serious problem. If you notice any of these signs, shut off the system and call a licensed HVAC technician for diagnosis.
What is the $5000 rule for HVAC systems?
The $5,000 rule is a common guideline for deciding whether to repair or replace an aging air conditioner. This guideline suggests that if the cost of a repair multiplied by the system's age in years exceeds a certain threshold, replacement might be more economical.