 how-to
HVAC Repair for Older Home Ductwork: A Homeowner's Guide
Table of Contents
- Why Older Home Ductwork Needs a Different Approach
- 5 Clear Signs of Leaking Air Ducts in an Older House
- The Biggest Risks: Asbestos, Lead Paint, and Deteriorated Insulation
- How to Check the Condition of Your Ductwork
- Sealing Old Ductwork: Mastic vs. Foil Tape
- When to Repair vs. Replace: Understanding Ductwork Replacement Cost
- DIY vs. Calling a Professional HVAC Contractor
- Conclusion: Protect Your Home and Your Air
- Frequently Asked Questions
Last Updated: September 6, 2026
Why Older Home Ductwork Needs a Different Approach
Older home ductwork is rarely built to modern HVAC standards, often featuring oversized runs, undersized returns, and materials that have aged out of code compliance.
Even a brand-new furnace or AC unit will underperform if the ducts feeding it are leaking, undersized, or insulated with deteriorating material. This guide covers how to spot trouble, what you can safely fix yourself, and when to call a professional.
5 Clear Signs of Leaking Air Ducts in an Older House
Leaking ducts are the most common culprit behind uneven temperatures and high utility bills in older homes. The five clearest signs are inconsistent room temperatures, whistling noises near duct joints, visible dust around vents, a sudden spike in energy loss, and stuffy rooms even when the system is running.
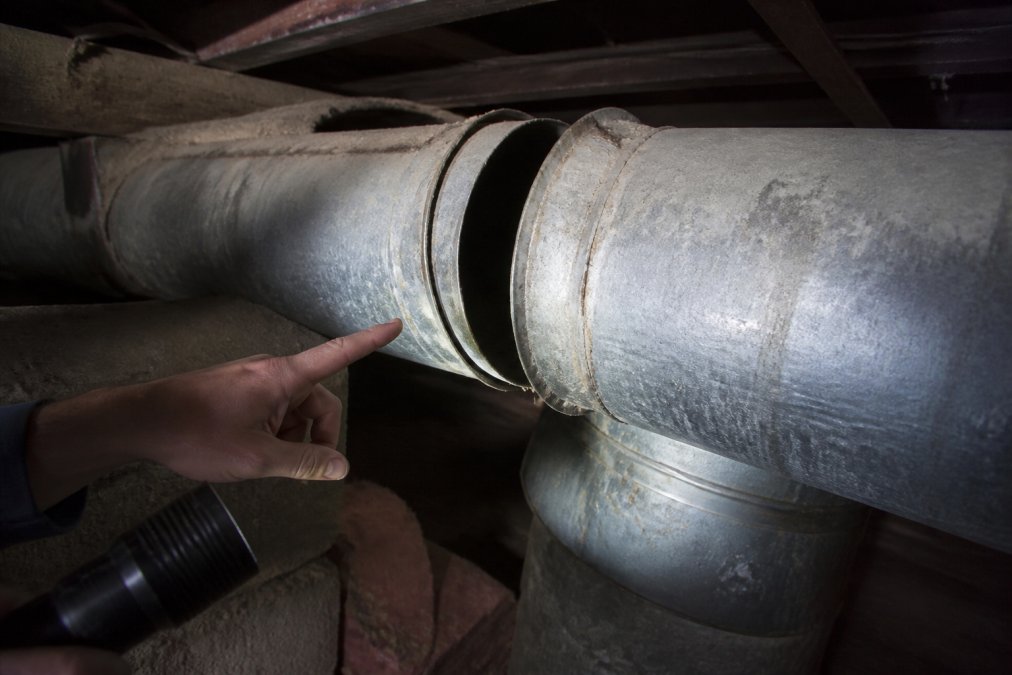
If you notice three or more, you are likely losing substantial conditioned air before it reaches your living space, forcing longer cycles and accelerating equipment wear.
Hold a tissue near suspected duct joints while the system runs. If it flutters or gets sucked toward the gap, you have found a leak, no special tools needed.
The Biggest Risks: Asbestos, Lead Paint, and Deteriorated Insulation
The most serious threats in older home ductwork are hazardous materials. Homes built before the 1980s may have asbestos-wrapped ducts, and lead-based paint on metal ducts was common in pre-1978 construction. Disturbing these during a DIY repair can release airborne contaminants.
The Environmental Protection Agency guidelines on asbestos in the home are clear: if you suspect asbestos, do not touch it. Asbestos is only dangerous when friable, meaning it can be crumbled by hand, which releases fibers into the air. If the insulation around your ducts is intact and undisturbed, the safest approach is often to leave it alone or have it professionally encapsulated.
Old fiberglass wrap that is sagging, damp, or rodent-damaged loses its R-value completely. If you can see ductwork in attics or crawlspaces, check whether the insulation is firmly attached and dry; if not, call a professional.
How to Check the Condition of Your Ductwork
A thorough inspection is the foundation of any repair decision, assessing materials that may be 50 to 100 years old.
Tools You Will Need
Gather a high-powered flashlight, a screwdriver, a mirror on a telescoping handle, a notepad, and a tissue or thin strip of plastic wrap for airflow testing. A moisture meter is valuable if you suspect water damage, but not essential.
Step 1: Map the System
Draw a rough floor plan marking supply and return registers, then locate main trunk lines and branch runs. Older homes often mix materials, galvanized steel for the main trunk, with branch runs that may be steel, flex duct, or transite. Mark the material type for each run; this map will help a contractor give a more accurate quote later.
Step 2: Inspect the Plenum and Main Trunk
The plenum is the box directly attached to your furnace or air handler. This is the highest-pressure point in the system, so leaks here are the most costly. Look for:
- Corrosion and rust: Surface rust is common on older steel, but deep pitting or rust that has eaten through the metal is a structural failure. Use your screwdriver to gently probe any rusted areas. If the screwdriver pushes through, the metal is compromised.
- Disconnected joints: Older ducts were often assembled with sheet-metal screws and foil tape. Over decades, the tape fails and the screws can back out due to vibration. Look for gaps at the seams where the plenum connects to the furnace and where the trunk lines attach to the plenum.
- Soot or discoloration: Dark streaks near joints can indicate a past or present combustion appliance issue, such as a backdrafting water heater or furnace. This is a safety concern that requires immediate professional attention.
Step 3: Trace the Branch Runs
Work your way out from the trunk, inspecting each branch run to its register boot. Pay special attention to:
- Sagging flex duct: Flex duct must be supported every 4 to 6 feet per manufacturer specifications and the International Residential Code. If you see sagging sections where the inner liner has pulled away from the outer jacket, the insulation value is compromised and the inner core is likely kinked, restricting airflow by up to 30% in that run.
- Crushed or collapsed sections: Look for areas where ducts have been crushed by stored items, stepped on in an attic, or compressed by settling floor joists. A crushed duct is a permanent restriction that no amount of sealing will fix.
- Rodent activity: Look for droppings, nesting material, or chew marks on flex duct and insulation. Rodents will chew through the inner liner, creating holes nearly impossible to find without a pressure test. If you find evidence of rodents, assume the duct is compromised and plan for replacement.
- Register boot connections: The boot is the metal box that transitions from round duct to the rectangular register in your floor or wall. These are often the first point of failure due to foot traffic and settling. Check that the boot is securely attached to the duct and that the gap between the boot and the drywall or floor is sealed.
Step 4: Perform a Pressure and Flow Check
With the system running, hold your tissue near every accessible joint. If it flutters or is pulled toward the gap, you have a leak. This test is most effective on the supply side, which is under positive pressure; on the return side, the tissue will be sucked against the gap.
Next, hold your hand a few inches above each register, the airflow should be steady and noticeable. A noticeably weaker room may have a kinked flex duct, a crushed section, or a partially closed damper. Many older homes have manual dampers near the trunk line; check the damper first, as it may have been closed by a previous homeowner.
Step 5: Document What You Find
Take photos of every issue and note its location on your sketch. This documentation lets a contractor prioritize their inspection and gives you a baseline to verify their findings.
A visual inspection cannot quantify total leakage; that requires a duct blaster test, which measures air loss in CFM. Most older-home systems test at 20% to 40% leakage or higher. If your visual inspection finds multiple issues, a duct blaster test is the next logical step.
Sealing Old Ductwork: Mastic vs. Foil Tape
Sealing old ductwork is one of the highest-value improvements you can make, and the choice between mastic sealant and foil tape matters. Mastic is a thick, paste-like sealant applied with a brush that creates a permanent, flexible seal; foil tape is a metal-backed adhesive tape. Standard duct tape fails within months, while both mastic and foil tape are rated for long-term use.
Call (702) 707-4242 for a free estimate →
For most applications on older metal ducts, mastic is superior because it bridges gaps and fills irregularities that tape cannot cover. Foil tape works well on straight, smooth joints but struggles on corners and uneven surfaces. Here is a quick comparison:
| Sealing Method | Best For | Durability | Application Difficulty |
|---|---|---|---|
| Mastic Sealant | Irregular joints, gaps, corners | Permanent when cured | Moderate; requires brush application and drying time |
| Foil Tape | Straight, smooth seams | Long-lasting but can peel on dirty surfaces | Easy; peel and stick |
| Standard Duct Tape | Temporary fixes only | Fails within months | Easy but not a real fix |
Before applying either, clean the metal surface thoroughly; dirt and grease will prevent adhesion. This is a manageable DIY project for accessible duct runs, but much of your ductwork may be hidden inside walls and floors. Sealing only accessible sections addresses part of the problem.
When to Repair vs. Replace: Understanding Ductwork Replacement Cost
The repair-or-replace decision balances immediate costs against long-term value. It is a matrix of four factors: material condition, accessibility, system age, and your long-term plans for the home.
The Decision Matrix
Score each factor and use the result to guide your conversation with a contractor.
| Factor | Favoring Repair | Favoring Replacement |
|---|---|---|
| Material Condition | Galvanized steel with surface rust and leaky joints | Crushed sections, deep corrosion with holes, deteriorated flex duct with inner liner damage |
| Leakage Rate | Under 20% total leakage (measured by duct blaster test) | Over 30% leakage, especially if leaks are in inaccessible wall cavities |
| Accessibility | Ducts in open basements, attics, or crawlspaces with clear access | Ducts buried in slab foundations, inside finished walls, or under additions |
| System Age | Furnace or AC is under 10 years old and in good condition | Equipment is near end of life (15+ years for furnaces, 12+ for AC) and will need replacement soon anyway |
| Home Plans | Staying for 5+ years and can recoup efficiency savings | Planning to sell within 2-3 years and need maximum resale value |
Scoring Your Situation
If three or more factors favor replacement, a full replacement is likely the better investment. If three or more favor repair, sealing and targeted section replacement will save you thousands.
The 50% Rule for Mixed Cases
If your furnace or AC is over 15 years old and duct leakage is above 20%, the smartest move is often to replace the equipment and seal the ducts at the same time. A new high-efficiency furnace is designed for a specific static pressure range; leaky, undersized ducts create high static pressure that shortens the blower motor's life. Sealing the ducts first, or simultaneously, protects your equipment investment, and most contractors offer a discount when bundling.
The Partial Replacement Strategy
When the main trunk is sound but branch runs are failing, partial replacement is the most cost-effective path. A typical scenario: a 60-year-old galvanized steel trunk with leaky joints but solid metal, while flex duct branch runs added during a 1980s renovation are crushed and kinked. Replacing only the accessible flex runs solves the airflow problem without opening walls, typically costing 30% to 50% of a full replacement.
When Replacement Is the Only Option
There are three situations where repair is not a viable option:
- Transite ducts: If your home has transite (cement-asbestos) ductwork, replacement is the only safe option. Transite was used in some homes from the 1930s through the 1970s. It is brittle, prone to crumbling, and the asbestos fibers can become airborne when the material degrades. No reputable contractor will repair transite; it must be removed by an asbestos abatement professional and replaced with modern ductwork.
- Ducts in slab foundations: If your ducts are embedded in a concrete slab and have collapsed or corroded, there is no way to repair them without breaking up the floor. In this case, the standard solution is to abandon the in-slab ducts and run new ductwork through the attic or along interior walls.
- Severe rodent contamination: If rodents have nested throughout the duct system and contaminated the insulation, the ducts cannot be effectively cleaned. The porous insulation material traps dander, droppings, and urine, and no amount of duct cleaning will fully remove it. Replacement is the only way to restore indoor air quality.
Getting a Defensible Quote
When you call a contractor, do not ask for a blanket "ductwork replacement" quote. Provide your inspection documentation and ask for a quote that itemizes: (1) sealing the main trunk, (2) replacing specific branch runs, and (3) replacing the entire system. This forces the contractor to justify each line item; a reputable contractor will welcome this approach.
DIY vs. Calling a Professional HVAC Contractor
Some ductwork maintenance is genuinely DIY-friendly. You can safely replace insulation on accessible duct runs, seal visible joints with mastic, and clean supply and return vents yourself. You should not attempt to rework duct sizing, relocate ducts, or handle suspected hazardous materials.
A professional brings tools that DIY work cannot replicate. A duct blaster test measures total system leakage, identifying leaks hidden behind walls, and static pressure testing tells you whether your ductwork is properly sized for your equipment.
This is where RTS Comfort Cooling & Heating earns its reputation as a trusted partner for older homes. Our team handles complex ductwork assessments, performs professional duct cleaning to improve indoor air quality, and provides the indoor air quality guidance from the Environmental Protection Agency that older homes often need. We also install smart thermostats that can help you monitor system performance and catch issues early, and our 24/7 emergency HVAC service means you are never left without heat or cooling while you wait for a solution.
Conclusion: Protect Your Home and Your Air
Your older home has character, craftsmanship, and quirks that new construction simply cannot replicate. Its ductwork, however, was not built to modern efficiency standards, and ignoring its condition means paying for energy you never receive and breathing air that may carry contaminants from dusty, leaky runs. The Department of Energy guidance on duct sealing confirms that sealing leaking ducts can significantly improve system efficiency, making it one of the smartest upgrades for an aging home.
Whether you need a full inspection, duct sealing, or a complete HVAC retrofit that respects your home's architecture, the team at RTS Comfort Cooling & Heating has the experience to handle it. We offer comprehensive services including duct cleaning, attic insulation, and smart thermostat installation, all backed by 24/7 emergency support. Call (702) 707-4242 for a free estimate and take the first step toward reliable climate control and better indoor air quality.
Frequently Asked Questions
Should I replace 20 year old ductwork?
Age alone isn't the deciding factor for older home ductwork. A 20-year-old system may have many years left if it was installed correctly and shows no major issues. However, if you notice signs of leaking air ducts, like high energy bills, uneven temperatures, or excessive dust, a professional inspection is needed. The condition of the materials, the quality of the original installation, and the presence of hazards like deteriorated insulation matter more than the age on the calendar.
How do I know if my old ductwork is leaking?
Common signs of leaking air ducts include rooms that are difficult to heat or cool, higher than normal energy bills, and a noticeable dusty smell when the system runs. You might also see visible gaps at duct joints or feel strong air escaping when the blower is on. In older homes, leaks often occur where sections of duct connect or where the main trunk line branches off to individual rooms. A professional pressure test can find hidden leaks.
Can you replace ductwork without removing walls?
Yes, in many cases. For older home ductwork, technicians can often run new ducts through attics, crawl spaces, and basements without opening up walls. This is a common approach when retrofitting modern HVAC into historic architecture. If ducts are inside walls, a full replacement might require some access holes, but a skilled contractor can often minimize damage. Sealing old ductwork in place is another option that avoids wall removal entirely.
What is the average cost to repair ductwork?
The cost to repair ductwork varies significantly based on the extent of the damage, the materials used, and the accessibility of the system in your older home. Repairing a single section of duct is far less expensive than a full replacement. Because every home is different, exact pricing on ductwork replacement cost is hard to quote without an in-person visit. Contact RTS Comfort Cooling & Heating at (702) 707-4242 for a free estimate.